How To Get Rid Of Red Spider Mites On Indoor Plants
Control spider mites destroying your houseplants with proven natural and chemical treatments. Learn to identify early infestations and prevent recurring attacks.
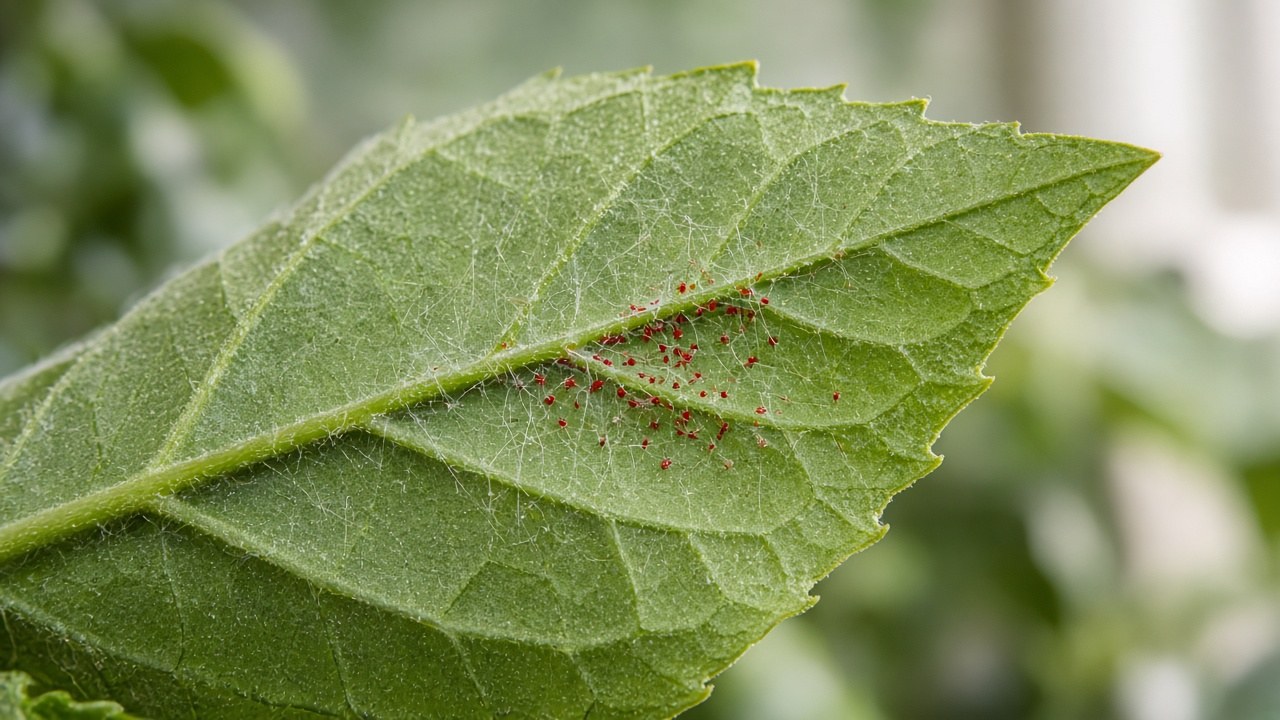
Spider mites are the most common and destructive pest of indoor plants. These microscopic arachnids feed by piercing plant cells and sucking out contents, causing stippling, yellowing, and eventually complete defoliation. Despite their tiny size, a single female can produce hundreds of offspring in weeks, leading to explosive infestations that can kill plants. Here’s how to identify, treat, and prevent spider mite damage on houseplants.
What Are Spider Mites?
Spider mites are not insects — they’re arachnids (related to spiders and ticks) that feed on plant sap.
Common species on houseplants:
- Two-spotted spider mite (Tetranychus urticae): Most common; can be red, orange, green, or brown
- Red spider mite (Tetranychus cinnabarinus): Bright red; thrives in hot, dry conditions
- Spruce spider mite: Less common indoors; prefers cooler temperatures
- Banks grass mite: Occasionally found on indoor grasses
Physical characteristics:
- Size: 0.5mm (barely visible to naked eye — about the size of a grain of salt)
- Shape: Oval body with eight legs
- Color: Variable (red, orange, brown, green, yellow) depending on species and what they’ve been eating
- Webbing: Produce fine silk webbing on heavily infested plants
Life cycle (indoors, year-round):
- Egg: Female lays 100-300 eggs on leaf undersides (spherical, translucent)
- Larva: Hatches in 3-5 days; has six legs; begins feeding immediately
- Nymph: Two nymphal stages (protonymph, deutonymph); develops eight legs
- Adult: Reaches maturity in 5-7 days; lives 2-4 weeks; reproduces continuously
- Complete cycle: 7-12 days under ideal conditions (hot and dry)
Why indoor plants are vulnerable:
- Low humidity (central heating and air conditioning)
- Warm, stable temperatures (70-85°F year-round)
- No natural predators indoors
- Plants often stressed (lower resistance)
- Mites brought in on new plants or contaminated potting soil
Identifying Spider Mite Damage
Early detection is critical for successful control.
Visual symptoms:
Early stage infestation:
- Stippling: Tiny yellow, white, or bronze dots on leaf surface (where mites pierced cells)
- Dull appearance: Leaves lose natural shine and gloss
- Fine webbing: Barely visible silk strands on leaf undersides or between leaves and stems
- Leaf undersides: Tiny moving specks visible with magnifying glass
Advanced infestation:
- Yellowing leaves: Entire leaves turn yellow or bronze
- Leaf drop: Heavy defoliation starting with lower, older leaves
- Dense webbing: Thick silk covering leaves, stems, and growing tips
- Visible mite colonies: Hundreds of mites clustered on leaf undersides
- Stunted growth: New growth distorted or fails to develop
- Plant death: Complete defoliation and dieback
Testing for mites (white paper test):
- Hold white paper under affected leaves
- Tap leaves sharply several times
- Examine paper with magnifying glass
- Look for tiny moving specks (mites)
- Rub specks with finger — if they leave red/green streaks, they’re mites
Most susceptible houseplants:
- Highly susceptible: English ivy, spider plant, palm trees, jade plant, fiddle leaf fig, croton, schefflera
- Moderately susceptible: Dracaena, pothos, philodendron, rubber plant, African violet
- Resistant: Snake plant (sansevieria), ZZ plant, cast iron plant, most succulents
Environmental conditions that trigger outbreaks:
- Indoor humidity below 40% (mites thrive in dry air)
- Temperatures 70-85°F
- Dusty conditions (dust coats leaves, provides mite habitat)
- Plants near heating vents or south/west windows
- Winter months when indoor air is driest
Immediate Isolation and Plant Assessment
First step: prevent spread to other plants.
Isolation protocol:
- Remove infected plant immediately: As soon as mites detected
- Place in quarantine location: Bathroom, garage, or separate room away from other plants
- Check nearby plants: Inspect all plants within 6 feet of infected plant
- Don’t move plants between rooms: Mites hitch rides on clothing, hands, and tools
Severity assessment:
Light infestation (treat and save):
- Stippling on less than 30% of leaves
- Little to no webbing visible
- Plant otherwise healthy and vigorous
- No leaf drop yet
- Action: Aggressive treatment; good recovery prognosis
Moderate infestation (treat but monitor):
- Stippling on 30-60% of leaves
- Visible webbing on some leaves
- Some yellowing and leaf drop
- New growth affected
- Action: Intensive treatment required; may take weeks to recover
Heavy infestation (consider discarding):
- Stippling on 60%+ of leaves
- Dense webbing covering entire plant
- Severe yellowing, leaf drop, and dieback
- Plant severely weakened
- Action: Treatment difficult; may be better to discard plant to protect collection
Cleaning tools and surfaces:
- Wipe down surfaces near infected plant with rubbing alcohol
- Clean tools (pruners, watering can) with 10% bleach solution
- Wash hands thoroughly after handling infected plants
- Change clothing if heavily infested plant brushed against you
Method 1: Water Spray Treatment (First-Line Defense)
Physical removal with water is effective for light to moderate infestations.
Why water works:
- Forceful spray knocks mites off leaves
- Many mites drown in water droplets
- Breaks up webbing that protects colonies
- Temporarily increases humidity (mites hate moisture)
- No chemicals needed
How to spray plants effectively:
-
Prepare treatment area:
- Move plant to bathtub, shower, or outdoors (if weather permits)
- Remove any decorative pots or saucers
- Ensure good drainage (plant will get very wet)
-
Prune heavily damaged leaves:
- Cut off leaves with dense webbing or severe stippling
- Remove any dead or dying foliage
- Place removed leaves in sealed plastic bag (don’t compost)
- Dispose of bag in outdoor trash immediately
-
Spray plant thoroughly:
- Use handheld shower head, hose nozzle, or spray bottle
- Spray with moderate pressure (not so hard it damages leaves)
- Target undersides of all leaves (where mites hide)
- Spray tops, stems, and trunk
- Spray soil surface (mites can hide there)
- Ensure water reaches all leaf crevices
-
Wipe leaves manually (optional but effective):
- Dip soft cloth or paper towel in water
- Gently wipe underside of each leaf
- Physically removes mites, eggs, and webbing
- Time-consuming but very effective for small plants
-
Let plant drain:
- Allow water to drain completely (30-60 minutes)
- Don’t return plant to saucer until drainage complete
- Shake excess water from leaves gently
Treatment schedule:
- Day 1: Initial thorough spray
- Day 3: Second spray (kills newly hatched mites)
- Day 6: Third spray (breaks mite reproduction cycle)
- Day 9: Fourth spray (ensures all generations killed)
- Week 2-3: Continue every 3-4 days until no mites visible for 2 weeks
Pros:
- Completely safe for plants and people
- No chemicals or residues
- Costs nothing
- Can be done immediately
- Increases humidity (benefits most houseplants)
Cons:
- Labor-intensive
- Must repeat many times
- Doesn’t kill eggs (only physical removal)
- Not effective for heavy infestations
- Some plants don’t tolerate repeated wetting (African violets, cacti)
Method 2: Insecticidal Soap Treatment
Fatty acid-based soap kills mites on contact without harsh chemicals.
How insecticidal soap works:
- Fatty acids penetrate mite’s protective coating
- Disrupts cell membranes
- Causes rapid dehydration and death
- Only kills mites it directly contacts
- No residual activity (breaks down quickly)
Choosing the right soap:
Commercial products (recommended):
- Safer Brand Insect Killing Soap
- Garden Safe Houseplant & Garden Insect Killer
- Bonide Insecticidal Soap
- Why commercial: Formulated specifically for plant safety; tested pH
Homemade recipe (if commercial unavailable):
- 1 tablespoon pure castile soap (Dr. Bronner’s unscented)
- 1 quart water
- Optional: 1 tablespoon vegetable oil (helps soap stick to leaves)
- Important: Don’t use dish soap on houseplants (can burn leaves)
Application instructions:
-
Test first:
- Spray one leaf or small section
- Wait 24-48 hours
- Check for damage (yellowing, brown spots, leaf drop)
- If damage occurs, dilute soap 50% and test again
-
Prepare plant:
- Remove heavily infested leaves
- Prune dead or damaged foliage
- Move plant to bathtub or treatment area
-
Spray thoroughly:
- Shake bottle to mix
- Spray until leaves are dripping wet
- Focus on undersides of leaves (where mites live)
- Spray tops, stems, and soil surface
- Ensure complete coverage
-
Let soap sit:
- Allow 10-15 minutes contact time
- Soap must touch mites to kill them
- Don’t rinse too quickly
-
Rinse plant (recommended):
- After 15 minutes, spray plant with clean water
- Removes dead mites and soap residue
- Reduces risk of leaf burn
- Especially important for sensitive plants
-
Dry plant:
- Shake off excess water
- Place in well-ventilated area to dry
- Don’t place in direct sun while wet (increases burn risk)
Treatment schedule:
- Every 3 days for 2 weeks: Kills newly hatched mites (eggs survive treatment)
- Then weekly for 3-4 weeks: Maintenance to catch any survivors
- Continue until: No new mite activity for 2 full weeks
Plants sensitive to insecticidal soap:
- African violets (test carefully)
- Ferns (especially maidenhair)
- Palms
- Succulents and cacti
- Gardenias
- Begonias with hairy leaves
Pros:
- Effective on all mobile mite stages
- Relatively safe for plants (if used correctly)
- Biodegradable
- Inexpensive
- No toxic residues
Cons:
- Doesn’t kill eggs (requires repeated applications)
- Can burn sensitive plants
- Requires thorough coverage
- Labor-intensive
- Some formulations damage plant waxes
For more details on making and using insecticidal soap, see our homemade insecticidal soap guide.
Method 3: Neem Oil Treatment (Long-Lasting Control)
Neem oil provides both contact kill and systemic protection against spider mites.
How neem oil works:
- Contact kill: Suffocates mites by coating their bodies
- Antifeedant: Mites stop feeding even if they survive
- Disrupts reproduction: Prevents eggs from hatching; sterilizes adults
- Residual protection: Remains active 7-14 days
- Fungicidal: Also treats powdery mildew and other fungal issues
Choosing neem products:
100% cold-pressed neem oil (most effective):
- Pure neem oil extract
- Must be mixed with emulsifier (soap)
- Longer shelf life
- Stronger pest control
- Examples: Dyna-Gro Pure Neem Oil, Harris Neem Oil
Ready-to-use neem spray (convenient):
- Pre-diluted and mixed
- Just spray from bottle
- Less effective than pure neem
- Shorter shelf life
- Examples: Garden Safe Neem Oil Extract, Bonide Neem Oil
Mixing pure neem oil:
- 2 tablespoons neem oil
- 1 teaspoon mild liquid soap (emulsifier)
- 1 gallon water
- Mix soap and water first, then add neem
- Shake vigorously before use
Application instructions:
-
Timing:
- Apply in evening (UV light degrades neem)
- Don’t spray if plant will be in direct sun within 24 hours
- Room temperature 65-85°F (neem is thick when cold)
-
Spray coverage:
- Shake mixture constantly (neem separates quickly)
- Spray entire plant to dripping point
- Focus on undersides of leaves
- Coat stems, trunk, and soil surface
- Ensure mites contacted by spray
-
Don’t rinse:
- Unlike soap, leave neem on plant
- It continues working as it dries
- Forms protective coating on leaves
-
Repeat applications:
- First week: Spray every 3 days (3 applications)
- Second week: Spray every 5-7 days (2 applications)
- Maintenance: Spray every 14 days until no mites for 1 month
Sensitive plants:
- Test on single leaf first
- Some plants don’t tolerate oily coatings
- Reduce concentration to 1 tablespoon per gallon for sensitive species
Soil drench method (systemic uptake):
- Mix neem oil as above
- Water plant with neem solution
- Plant absorbs neem compounds through roots
- Provides internal protection (mites ingest when feeding)
- Repeat every 3 weeks for 3 months
Pros:
- Kills mites at all life stages (including eggs to some degree)
- Provides residual protection (7-14 days)
- Also treats fungal diseases
- Natural, plant-derived
- Disrupts mite reproduction cycle
Cons:
- Can burn plants in hot sun or hot weather
- Oily residue on leaves (cosmetic issue)
- Strong smell (some find unpleasant)
- Requires repeated applications
- More expensive than soap
Method 4: Rubbing Alcohol Treatment (Spot Treatment)
Isopropyl alcohol provides quick kill for localized infestations.
How alcohol works:
- Dissolves mites’ protective waxy coating
- Rapid dehydration
- Kills on contact (within seconds)
- Evaporates quickly (no residue)
Mixing alcohol spray:
Standard formula:
- 1 part rubbing alcohol (70% isopropyl)
- 1 part water
- Optional: Few drops mild dish soap (helps spread alcohol)
Stronger formula (for heavy infestations):
- 3 parts alcohol
- 1 part water
- Use cautiously (higher plant damage risk)
Application methods:
Spray method (for light infestations):
- Mix alcohol and water in spray bottle
- Spray affected areas of plant
- Focus on visible mite colonies
- Spray undersides of leaves
- Let air dry (don’t rinse)
Cotton swab method (for spot treatment):
- Dip cotton swab in straight or diluted alcohol
- Dab individual mite colonies
- Wipe along leaf veins (mite highways)
- Reach into leaf crevices and growing points
- Dispose of swabs after use
Cotton ball method (for large leaves):
- Soak cotton ball in alcohol solution
- Gently wipe undersides of leaves
- Removes mites, webbing, and eggs physically
- Re-soak cotton frequently
- Use fresh cotton for each plant
Treatment schedule:
- Every 3 days for 2 weeks: Kills newly hatched mites
- Test between applications: Check for plant damage
- Reduce strength if damage occurs: Dilute to 1:2 or 1:3 ratio
Safety precautions:
- Test first: Spray single leaf; wait 48 hours
- Don’t use in hot sun: Increases burn risk
- Don’t use on sensitive plants: African violets, ferns, some succulents very sensitive
- Ventilate area: Alcohol fumes strong in enclosed spaces
- Keep away from flames: Alcohol is flammable
Sensitive plants (use with extreme caution):
- Begonias
- African violets
- Ferns
- Young seedlings
- Variegated plants
Pros:
- Very fast kill (seconds)
- No mixing required (if using 70% straight)
- Inexpensive and readily available
- Evaporates quickly (no rinsing needed)
- Good for spot treatment of individual colonies
Cons:
- Can severely damage plants if overused
- Dries out leaf tissue
- Doesn’t kill eggs reliably
- Requires repeated applications
- Fumes can be strong
- High alcohol concentrations burn leaves easily
Method 5: Miticides (Chemical Control)
Specialized pesticides formulated specifically for mite control.
When to use miticides:
- Heavy infestations unresponsive to organic methods
- Valuable or irreplaceable plants
- Multiple plants infected
- Recurring infestations despite prevention efforts
Common active ingredients:
Abamectin (Avid):
- Systemic miticide
- Kills all mite life stages
- Single application often sufficient
- Long residual (2-3 weeks)
- Professional-grade product
Spiromesifen (Forbid):
- Kills eggs and immature mites
- Doesn’t kill adults (use with knockdown product)
- Long-lasting (4-6 weeks)
- Low toxicity to mammals
Bifenthrin (Talstar):
- Broad-spectrum insecticide/miticide
- Quick knockdown of adults
- 2-3 week residual
- Moderate toxicity
Horticultural oil (gentler option):
- Suffocates mites and eggs
- 1-2% solution for most houseplants
- Must achieve complete coverage
- Repeat every 7 days for 3 weeks
Application guidelines:
- Read label carefully: Follow all safety instructions
- Wear protective equipment: Gloves, long sleeves, eye protection
- Apply outdoors if possible: Better ventilation
- Spray to runoff: Complete coverage essential
- Keep plant in quarantine: Don’t return to plant collection for 24-48 hours
- Repeat per label: Usually 7-14 days after first application
Safety precautions:
- Keep away from children and pets
- Don’t spray near fish tanks or aquariums (highly toxic to aquatic life)
- Ventilate area thoroughly
- Don’t use on edible plants unless label specifies
- Store in original containers
- Dispose of empty containers properly
Pros:
- Highly effective (90-100% kill)
- Fast results
- Long residual protection
- Requires fewer applications
Cons:
- Toxic to humans, pets, and beneficial insects
- Environmental concerns
- Expensive
- Can damage sensitive plants
- Mites can develop resistance with overuse
Preventing Spider Mite Infestations
Proactive measures reduce the likelihood of recurring problems.
Increase humidity (most important):
- Target humidity: 50-60% for most houseplants (mites can’t thrive above 50%)
- Methods:
- Run humidifier near plants (most effective)
- Group plants together (creates humid microclimate)
- Place pots on pebble trays filled with water
- Mist plants daily (temporary fix only)
- Grow plants in bathrooms or kitchens (naturally humid)
Regular plant maintenance:
- Inspect weekly: Check leaf undersides with magnifying glass
- Dust leaves: Wipe leaves with damp cloth every 2-4 weeks (removes dust and early mite colonies)
- Shower plants monthly: Rinse plants in shower or sink (prevents mite buildup)
- Prune dead foliage: Remove dead leaves and stems (mite hiding spots)
Quarantine new plants:
- Isolate all new plants for 2-3 weeks before adding to collection
- Inspect thoroughly for mites, eggs, and webbing
- Treat preventively with neem oil or insecticidal soap
- Only introduce to collection after quarantine period
Avoid stressed plants:
- Water appropriately: Both overwatering and underwatering stress plants
- Fertilize regularly: Weak, nutrient-deficient plants attract mites
- Provide adequate light: Etiolated plants more susceptible
- Don’t overcrowd: Good air circulation around plants
- Repot when needed: Root-bound plants stressed and vulnerable
Environmental controls:
- Avoid hot, dry locations: Don’t place plants near heating vents, fireplaces, or sunny south windows
- Increase air circulation: Use small fan on low setting (mites prefer still air)
- Monitor in winter: Indoor air driest in winter (peak mite season)
Beneficial insects (for greenhouses or sunrooms):
- Predatory mites (Phytoseiulus persimilis): Feed exclusively on spider mites
- Release when mites first detected
- Require high humidity (60%+)
- Establishes population and continues hunting
- Ladybugs: Eat spider mites and eggs
- Harder to keep contained indoors
- Better for greenhouses
- Lacewings: Larvae voracious mite predators
- Release eggs near affected plants
For comprehensive information on identifying and controlling common houseplant pests, see our mealybug control guide and whitefly treatment guide.
The Bottom Line
Spider mites are the most damaging indoor plant pest, but they can be controlled with persistent, repeated treatments. For light infestations, spray plants thoroughly with water every 3 days for 2 weeks — this physically removes mites and breaks up protective webbing. For moderate to heavy infestations, apply insecticidal soap or neem oil every 3-5 days for 3-4 weeks, ensuring complete coverage of leaf undersides where mites hide.
The key to success is breaking the mite’s 7-12 day life cycle with repeated applications that kill newly hatched generations. A single treatment, no matter how thorough, will not eliminate spider mites because eggs survive most treatments and hatch days later. Increasing indoor humidity above 50% is the single most effective prevention measure — spider mites thrive in hot, dry air and struggle to reproduce in humid conditions.
Isolate infected plants immediately to prevent mites from spreading to your entire houseplant collection. Regular weekly inspections of leaf undersides, monthly showers for plants, and quarantining new additions for 2-3 weeks will catch infestations early when they’re easiest to control. With consistent treatment and proper environmental conditions, even heavily infested plants can make a full recovery within 4-6 weeks.