Sleeper Retaining Wall Guide (AU Home Gardens)
Complete guide to timber sleeper retaining walls for Australian gardens. Learn when to DIY vs hire pros, materials, construction steps, and design ideas for sloping Melbourne and Peninsula blocks.
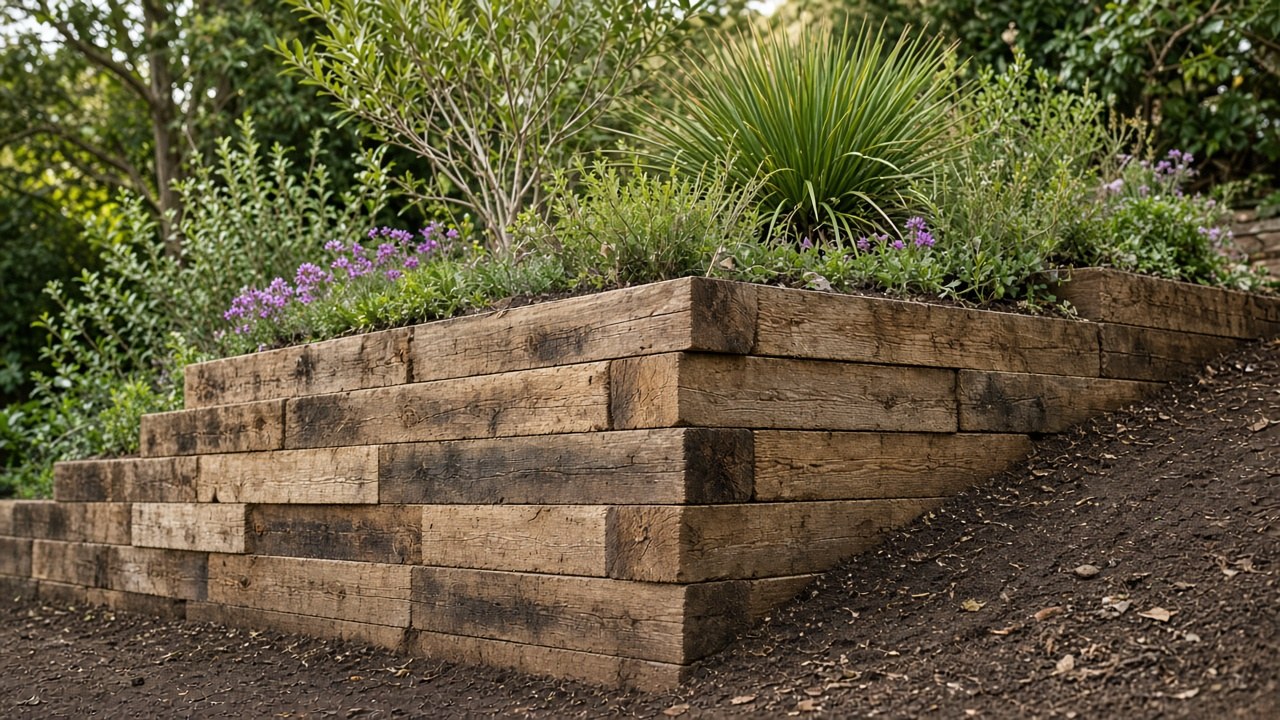
Sloping blocks are common across Australian suburbs, especially in Melbourne, the Mornington Peninsula, Adelaide hills, and Sydney’s North Shore. When you need to create level garden beds, terraces, or usable outdoor spaces on a slope, retaining walls are the solution. Timber sleeper retaining walls have become one of the most popular DIY and professional choices for Australian home gardens — they’re relatively affordable, versatile, and suit both cottage and contemporary garden styles. Here’s everything you need to know about building sleeper retaining walls for Australian yards.
What Is a Sleeper Retaining Wall?
A sleeper retaining wall is a retaining structure built from timber sleepers (large rectangular timber beams, typically 200mm x 75-100mm x 2.4-3.0m) stacked horizontally or installed vertically to hold back soil on sloping sites.
Common uses:
- Creating level terraces on sloping blocks
- Building raised garden beds
- Defining patio or lawn areas on slopes
- Preventing soil erosion
- Creating usable outdoor space from steep gardens
Height range: Sleeper retaining walls are suitable for low to medium-height walls — typically 300mm to 1200mm high. For walls over 1000-1200mm, engineering and council permits are usually required, and concrete or block walls may be more appropriate.
Timber Sleeper Types for Retaining Walls
1. Hardwood sleepers
What they are: Dense Australian hardwoods — typically ironbark, spotted gum, jarrah, or recycled railway sleepers.
Pros:
- Extremely durable (20-40+ years for new hardwood, 10-30 years for recycled)
- Naturally resistant to rot and termites (no chemical treatment needed)
- Strong and heavy (provides structural stability)
- Recycled railway sleepers have rustic, weathered aesthetic
Cons:
- Expensive ($60-150 per sleeper depending on species and whether new or recycled)
- Heavy (50-100kg each) — difficult to handle and position
- Recycled railway sleepers may contain creosote or other contaminants (not suitable near vegetable gardens or water sources)
Best for: Permanent structures, high-quality installations, walls over 600mm high, cottage or rustic gardens.
2. Treated pine sleepers
What they are: Softwood (pine) pressure-treated with preservatives (typically copper-based treatments like ACQ or CCA-replacement) to resist rot and termites.
Pros:
- Affordable ($30-60 per sleeper)
- Widely available (Bunnings, landscape suppliers)
- Lighter than hardwood (easier to handle)
- H4 or H5 rating suitable for in-ground use
Cons:
- Shorter lifespan than hardwood (10-20 years depending on treatment and environment)
- Chemical treatment raises concerns near vegetable gardens (modern copper-based treatments are considered safer than old CCA treatment)
- Less structurally strong than hardwood (not ideal for tall walls or heavy loads)
- Can warp or twist over time
Best for: Budget-conscious projects, walls under 600mm high, temporary or medium-term structures (10-15 years), modern garden styles.
3. Recycled hardwood sleepers
What they are: Reclaimed railway sleepers, bridge timbers, or demolition hardwood.
Pros:
- Unique weathered character (grey patina, bolt holes, wear marks)
- Durable hardwood at lower cost than new hardwood ($40-90 per sleeper)
- Environmentally friendly (reclaimed material)
- Suits cottage, farmhouse, and industrial garden styles
Cons:
- Variable quality (check for rot, cracks, excessive damage)
- May contain creosote or other preservatives (can leach into soil — avoid near edibles or water features)
- Inconsistent dimensions (makes construction more challenging)
- Heavy
Best for: Decorative walls, rustic gardens, walls away from vegetable gardens and water sources.
Recommended sleeper dimensions
Standard sleeper size: 200mm (height) x 75-100mm (depth) x 2400mm (length).
For retaining walls:
- Walls up to 600mm high: 75mm or 100mm depth sleepers are adequate
- Walls 600-1200mm high: 100mm depth sleepers minimum (or engineer-designed with structural support)
- Longer sleepers (3000mm or 3600mm): Reduce number of joins, but heavier to handle
When to DIY vs Hire a Professional
DIY-suitable retaining walls
You can DIY if:
- Wall height is under 600mm (2-3 sleepers high)
- Slope is gentle to moderate (not steep or unstable)
- Wall length is manageable (<10m for first project)
- Soil is stable (not clay that expands/contracts significantly)
- You have basic DIY skills and tools
- You have a helper (sleepers are heavy)
- No structures, trees, or services nearby that could be affected
Cost savings: DIY saves $150-300 per linear metre (labour). For a 10m wall, that’s $1,500-3,000 saved.
Professional installation required when
Hire a professional if:
- Wall height exceeds 600mm (engineering may be required)
- Soil is unstable, clay-heavy, or saturated
- Site access is difficult (steep, narrow, or machinery can’t access)
- Drainage is complex
- Permit or engineering certification required (walls >1000mm often need council approval)
- Wall supports structures, driveways, or property boundaries
- You’re unsure about structural requirements
Professional advantages:
- Engineering knowledge (proper footings, drainage, structural support)
- Efficient installation (days vs weeks for DIY)
- Guaranteed structural integrity
- Access to machinery (post-hole diggers, excavators, compactors)
- Insurance and liability coverage
Peninsula Hard Yards provides professional sleeper retaining wall design and installation across Australian properties, including engineering consultation, council permits, and complete landscaping services for sloping blocks.
Building a Sleeper Retaining Wall: Step-by-Step (DIY)
This guide covers a simple horizontal sleeper retaining wall up to 600mm high (3 sleepers). For taller walls or complex sites, consult a structural engineer or landscaper.
Tools and materials needed
Tools:
- Spade and mattock
- Post-hole digger (manual or hired)
- Level (spirit level and string line level)
- Tape measure
- Drill and long wood bits (for vertical reo)
- Chainsaw or circular saw (for cutting sleepers to length)
- Rubber mallet
- Wheelbarrow
Materials:
- Timber sleepers (calculate number needed: wall height ÷ sleeper height)
- Vertical support posts: 100mm x 100mm treated pine or hardwood posts, 1.2-1.5m long (one post every 1.2-1.8m along wall)
- Galvanised steel rebar or coach screws (to pin sleepers together vertically)
- Crushed rock or roadbase (for drainage layer behind wall)
- Drainage pipe (65-100mm agricultural slotted pipe)
- Geotextile fabric (weed mat)
- Concrete (for post footings if required)
Construction steps
1. Plan and mark
- Measure wall location and mark with string line and stakes
- Check local regulations: walls over 1000mm may require permit or engineering
- Confirm no underground services (water, gas, electricity, sewer) in excavation zone — call “Dial Before You Dig” (1100) free service
2. Excavate
- Excavate trench along wall line
- Trench depth: Bury bottom sleeper 100-150mm below ground level (provides foundation and prevents base from kicking out)
- Trench width: Sleeper depth + 300mm (allows space for drainage layer behind wall)
- Remove topsoil and loose material. Compact base with hand tamper or plate compactor.
3. Install vertical support posts (recommended)
Why: Vertical posts prevent wall from bowing forward under soil pressure.
- Dig post holes every 1.2-1.8m along wall line (closer spacing for taller walls or heavy soil)
- Post hole depth: 600-900mm deep (at least half the above-ground wall height)
- Position posts 100-200mm behind front face of wall
- Set posts in concrete (for walls over 450mm high) or compacted gravel (for short walls)
- Use level to ensure posts are vertical
- Allow concrete to cure 24-48 hours before continuing
Alternative for short walls (<450mm): Skip posts and rely on rebar pinning alone. Adequate for low walls in stable soil.
4. Lay first sleeper
- Position first sleeper in trench, butted against vertical posts (if using posts)
- Use level to check sleeper is level along its length and side-to-side
- Pack gravel or soil beneath sleeper to adjust level
- Bury 100-150mm of bottom sleeper below ground
5. Pin sleepers vertically
- Drill vertical holes through centre of first sleeper (use long wood bit)
- Drive galvanised steel rebar (12-16mm diameter, 600-1200mm long depending on wall height) through holes down into ground 300-600mm
- Space rebar every 1.0-1.5m along sleeper length
- Rebar prevents first sleeper from shifting forward
Alternative: For short walls, use galvanised coach screws to attach sleepers to vertical posts instead of rebar.
6. Stack second and subsequent sleepers
- Place second sleeper on top of first
- Joint pattern: Stagger joints (like bricks) — if first sleeper has a join at 1.2m along wall, second sleeper’s join should be at 0.6m or 1.8m
- Drill vertical holes through second sleeper and into first sleeper
- Drive rebar or long coach screws (200-300mm) through second sleeper into first sleeper to pin them together
- Repeat for third sleeper if building higher
7. Attach sleepers to vertical posts
If using vertical posts:
- Drill horizontal holes through sleepers into posts
- Drive long galvanised coach screws (150-200mm) or bolts through sleeper into post
- Two screws per sleeper per post (top and bottom of sleeper)
8. Install drainage layer
Critical step — proper drainage prevents water buildup behind wall, which causes structural failure.
- Line back of trench with geotextile fabric (prevents soil washing through drainage rock)
- Place 65-100mm slotted agricultural drainage pipe at base of wall (behind sleepers, on top of fabric)
- Pipe should slope slightly (1:100 gradient) to drain water away
- Outlet pipe ends at natural drainage point (side of wall, downslope)
- Backfill behind wall with 200-300mm layer of crushed rock or blue metal (free-draining aggregate)
- Fold geotextile fabric over top of drainage rock (prevents soil washing down into rock)
9. Backfill with soil
- Fill remaining space behind wall with excavated soil (or better quality soil if original was poor)
- Compact each 200mm layer of soil as you fill (use hand tamper or boots)
- Backfill slightly lower than top of wall (allows for settling)
10. Finish
- Ensure sleepers are securely pinned and stable
- Check drainage pipe outlets are clear
- Mulch or plant garden beds above wall
- Allow 2-4 weeks for settling before planting heavily on newly backfilled soil
Common construction mistakes
Not burying bottom sleeper: Bottom sleeper must be buried 100-150mm to prevent base from kicking out under pressure.
Poor drainage: No drainage pipe or gravel layer = water pressure builds behind wall = wall fails. Drainage is non-negotiable.
Not pinning sleepers vertically: Unpinned sleepers shift and separate over time. Always use rebar or coach screws to pin sleepers together.
Insufficient vertical posts: Walls over 450mm need vertical posts every 1.2-1.8m. Without posts, wall bows forward.
Joints aligned vertically: If joints between sleepers stack vertically (not staggered), wall is structurally weak. Stagger joints like brickwork.
Using untreated timber in ground contact: Untreated timber rots within 2-5 years. Always use H4/H5 treated pine or naturally durable hardwood for in-ground use.
Drainage: The Most Important Part
Why drainage matters: Water accumulating behind retaining walls creates hydrostatic pressure (water pressure) that pushes walls forward. Even well-built walls fail without drainage.
What proper drainage includes:
-
Drainage pipe (slotted agricultural pipe, 65-100mm) at base of wall, behind sleepers. Pipe collects water and channels it away from wall.
-
Drainage gravel (200-300mm layer of crushed rock, blue metal, or roadbase) behind wall. Free-draining aggregate allows water to flow down to drainage pipe instead of saturating soil.
-
Geotextile fabric (weed mat) between soil and drainage gravel. Prevents soil washing through gravel and clogging drainage.
-
Weep holes (optional, for timber walls): 50mm diameter holes drilled through sleepers every 1.5-2.0m along wall at base level. Allows water to drain through wall face. More common in concrete/block walls; less critical for timber if drainage pipe and gravel are present.
-
Surface drainage: Ensure stormwater or irrigation runoff doesn’t flow toward wall. Redirect surface water away from wall with swales, channel drains, or grading.
Cost of drainage materials: ~$30-60 per linear metre (pipe, gravel, fabric). Never skip this to save money.
How High Can You Build a Sleeper Wall?
General guidelines (varies by region and local codes):
300-600mm (1-3 sleepers): DIY-suitable. No permit typically required. Basic footings and drainage.
600-1000mm (3-5 sleepers): Experienced DIY or professional. Engineering may be recommended. Vertical posts essential. Improved footings.
1000-1200mm (5-6 sleepers): Professional installation recommended. Engineering required in most areas. Council permit required. Concrete footings, heavy vertical posts or steel posts.
Over 1200mm: Definitely professional. Engineering certification required. Council permit required. May need concrete or masonry wall instead of timber.
Note: Local regulations vary. Some councils require permits for walls over 600mm, others over 1000mm. Check with your local council before building.
Sleeper Retaining Wall Design Ideas
1. Terraced garden beds
Create multiple low retaining walls (300-600mm high) stepping up a slope. Each terrace becomes a level garden bed. Popular for vegetable gardens, native gardens, or ornamental planting on sloping blocks.
Spacing: Leave 1.5-3.0m between terraces (enough room to access beds comfortably).
2. Raised veggie beds
Use sleepers to build raised beds (400-600mm high) on flat or gently sloping ground. Provides improved drainage, warms soil faster in spring, reduces bending, and keeps vegetables above ground level (less pest damage).
Caution: Use hardwood or modern treated pine (copper-based treatment) for edible gardens. Avoid recycled railway sleepers near vegetables (creosote contamination).
See our raised garden beds guide for more raised bed construction details.
3. Level patio or lawn area
Build sleeper retaining wall to hold back slope, creating level area for patio, deck, or lawn. Common for sloping Melbourne and Peninsula blocks where usable flat space is limited.
Engineering note: Walls supporting patios, decks, or structures usually require engineering certification.
4. Driveway retaining wall
Use hardwood sleepers to retain soil alongside sloping driveways. Prevents soil erosion onto driveway and creates planting beds above.
Structural note: Use 100mm depth sleepers minimum, vertical posts every 1.2m, and heavy-duty footings. Walls near driveways endure vehicle vibration and drainage runoff.
5. Combined with steel edging
Use sleeper retaining walls for major level changes (600-1200mm) and steel edging for minor level changes (100-300mm) elsewhere in the garden. The combination creates cohesive design while using appropriate materials for each application.
For comprehensive steel edging information, see our steel garden edging guide.
6. Curved sleeper walls
Sleepers can create gentle curves by cutting shorter lengths (600-1200mm) and angling joins slightly. Tight curves are difficult with sleepers; consider steel edging or stackable blocks for tight radii.
7. Integrated seating
Build retaining wall with wider capping sleeper (e.g., 200mm x 200mm) to create built-in seating along patio edges or garden borders.
Cost of Sleeper Retaining Walls (2026)
DIY costs (materials only)
Per linear metre for 600mm high wall (3 sleepers):
- Treated pine sleepers: $50-90/m
- Hardwood sleepers: $100-200/m
- Vertical posts: $15-30/m
- Rebar/coach screws: $10-20/m
- Drainage (pipe, gravel, fabric): $30-60/m
- Total DIY (treated pine): $105-200/m
- Total DIY (hardwood): $155-310/m
For 10m long, 600mm high treated pine wall: ~$1,050-2,000 materials.
Professional installation costs
Total cost (materials + labour):
- 300-600mm high wall: $250-450 per linear metre
- 600-900mm high wall: $400-700 per linear metre
- 900-1200mm high wall: $600-1000+ per linear metre
For 10m long, 600mm high wall (professional): ~$2,500-4,500 total.
Add for:
- Engineering design: $800-2,000
- Council permit: $200-800
- Difficult access (hand-dig, manual materials carry): +30-50% labour
- Concrete footings or gabion baskets: +$50-150/m
Alternatives to Sleeper Retaining Walls
Concrete block or besser block walls
Pros: Stronger, suitable for tall walls (1200mm+), longer lifespan (40+ years).
Cons: More expensive, requires footings and mortaring, less DIY-friendly, industrial appearance (unless rendered).
When to choose blocks: Tall walls (>1000mm), heavy soil pressure, structural support required.
Treated pine or hardwood post-and-rail retaining
Pros: Good drainage (gaps between rails), rustic appearance.
Cons: More complex construction, vertical posts must be deeply buried or concreted.
When to choose: Rural or cottage gardens, where drainage is critical.
Steel retaining walls
Pros: Thin profile, modern aesthetic, extremely strong, suitable for tall walls.
Cons: Expensive ($600-1200/m installed), requires engineering and professional installation.
When to choose: Modern gardens, tall walls, where space is limited (thin profile).
Gabion walls (rock-filled wire baskets)
Pros: Excellent drainage, strong, industrial aesthetic, flexible (handles ground movement).
Cons: Expensive (rock + baskets), less DIY-friendly for tall walls.
When to choose: Modern or industrial gardens, areas with ground movement, drainage-critical sites.
Dry-stacked stone walls
Pros: Natural appearance, drainage through gaps, long-lasting.
Cons: Skilled labour required (stone masonry), expensive, heavy materials.
When to choose: Cottage or heritage gardens, where natural appearance critical.
Maintenance and Lifespan
Treated pine sleeper walls
Lifespan: 10-20 years (depends on treatment quality, drainage, and exposure).
Maintenance:
- Inspect annually for rot, insect damage, or structural movement
- Check drainage outlets are clear
- Re-level backfill soil if settling occurs
- Consider staining or oiling every 3-5 years to extend lifespan (optional)
Hardwood sleeper walls
Lifespan: 20-40+ years.
Maintenance:
- Minimal maintenance required
- Check structural integrity every 2-3 years
- Clear drainage outlets annually
Common failure modes
Wall leans forward: Usually caused by poor drainage (water pressure behind wall) or inadequate vertical posts/footings. Fix by improving drainage and adding support posts.
Sleepers separate or shift: Caused by inadequate pinning (rebar or coach screws). Fix by drilling and pinning sleepers together.
Base kicks out: Bottom sleeper wasn’t buried deep enough. Fix by excavating, reburying bottom sleeper, and pinning to ground with rebar.
Rot or termite damage: Timber wasn’t treated for in-ground use, or drainage failed and timber stayed wet. Replace damaged sleepers with properly treated timber, improve drainage.
Final Thoughts
Sleeper retaining walls are a practical, affordable, and attractive solution for managing slopes in Australian gardens. For low walls up to 600mm high on stable soil, DIY installation is achievable with basic tools, careful planning, and attention to drainage. Key success factors are burying the bottom sleeper, pinning sleepers together vertically, installing vertical support posts every 1.5m, and — most importantly — providing proper drainage behind the wall.
For taller walls (over 600mm), unstable soil, difficult sites, or where structural engineering is required, professional installation is strongly recommended. Experienced landscapers have the tools, knowledge, and insurance to build retaining walls that last decades without structural issues.
Whether you choose affordable treated pine for a 10-15 year solution or invest in hardwood for a 30+ year structure, sleeper retaining walls remain one of the most versatile and popular choices for Australian sloping blocks, particularly across Melbourne’s undulating suburbs and the Mornington Peninsula’s coastal slopes.
For professional sleeper retaining wall design, engineering consultation, council permits, and installation, Peninsula Hard Yards provides complete landscaping services including structural retaining walls, terracing, and garden transformations for sloping Australian properties.