Steel Garden Edging Ideas for Australian Yards
Complete guide to steel garden edging in Australia. Compare steel vs timber, concrete, and plastic edging, learn installation tips, and explore design ideas for clean, modern Australian landscaping.
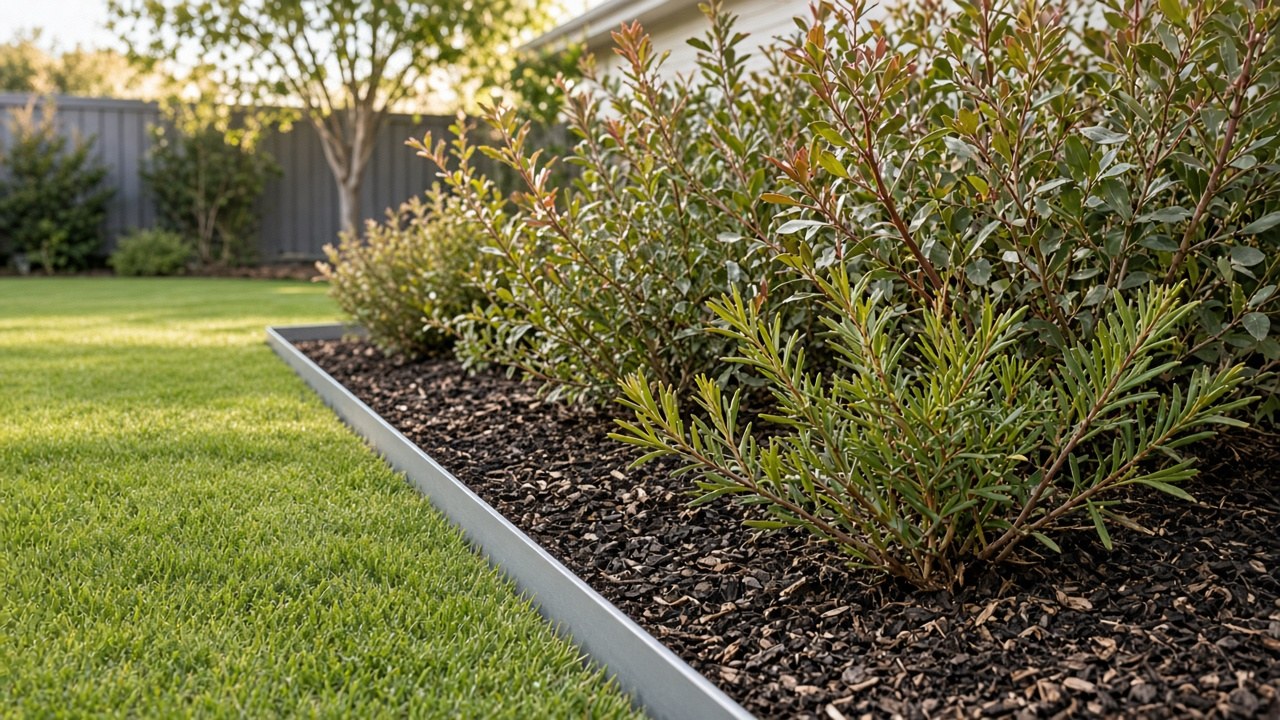
Garden edging defines the boundaries between lawn and garden beds, paths and planting areas, or different landscaping zones. It’s functional — preventing grass from invading garden beds and mulch from spilling onto lawns — but it’s also a design element that shapes the look and feel of your outdoor space. Steel edging has become one of the most popular choices for Australian gardens, offering clean lines, durability, and a modern aesthetic. Here’s everything you need to know about steel garden edging for Australian yards.
What Is Steel Garden Edging?
Steel garden edging (also called metal garden edging, steel lawn edging, or corten edging when made from weathering steel) consists of long strips of galvanised or corten steel installed vertically into the ground to create a physical barrier between different landscaping areas.
Common types:
Galvanised steel edging: Standard steel coated with zinc to prevent rust. Typically silver/grey colour. Affordable and long-lasting (20+ years in most Australian climates).
Corten steel edging (weathering steel): Special steel alloy that forms a protective rust patina when exposed to weather. Distinctive orange-brown colour. Popular for modern, industrial, or native Australian garden designs. More expensive than galvanised steel but highly durable (50+ years).
Powder-coated steel edging: Galvanised steel with coloured powder-coat finish. Available in black, charcoal, olive green, or custom colours. Combines durability with aesthetic flexibility.
Thickness and height: Typically 1-3mm thick, 100-300mm high. Thicker steel (2-3mm) is more rigid and suitable for curved designs or heavy soil pressure. Taller edging (200-300mm) works for raised beds or significant level changes.
Why Choose Steel Edging?
1. Clean, modern aesthetic
Steel edging creates sharp, defined lines that suit contemporary Australian landscape design. The thin profile (1-3mm thickness) is almost invisible from a distance, letting your plants and hardscaping take centre stage rather than the edging itself.
Best for: Modern, minimalist gardens, native Australian gardens, courtyard gardens, commercial landscaping, coastal properties.
2. Durability
Steel edging lasts 20-50+ years depending on type and environment. It won’t rot like timber, crack like concrete, or degrade like plastic.
Galvanised steel: 20-30 years in most climates. Can rust in coastal areas or very wet climates if the zinc coating wears through.
Corten steel: 50+ years. The protective rust patina prevents further corrosion. Ideal for harsh environments (coastal, tropical, high rainfall).
3. Flexibility
Steel edging bends easily to create curves, circles, and serpentine borders. It’s one of the best materials for curved designs. Timber and concrete edging struggle with curves; steel handles them naturally.
4. Low maintenance
Once installed, steel edging requires no maintenance. It won’t warp, split, or settle like timber sleepers. You don’t need to repaint, reseal, or replace sections.
5. Effective lawn barrier
Steel edging’s continuous, buried edge (typically buried 50-150mm deep) prevents lawn runners (kikuyu, couch) from invading garden beds. More effective than timber or stone edging, which runners can creep under or through gaps.
6. Bushfire resistance
Steel edging is non-combustible. In bushfire-prone areas, steel is a safer choice than timber. Corten and galvanised steel won’t catch fire or contribute to ember spread.
7. Environmentally friendly
Steel is fully recyclable. Corten steel requires no painting or chemical treatment. Galvanised steel lasts decades, reducing replacement waste.
Steel Edging vs Other Edging Materials
Steel vs Timber sleepers
Timber sleepers (hardwood or treated pine):
Pros: Natural appearance, budget-friendly for straight edges, good for raised beds and retaining walls.
Cons: Rot and termite damage (5-15 year lifespan), require maintenance (oiling, sealing), heavy and difficult to install, can’t create tight curves, chemical treatment concerns (treated pine).
When to choose timber: Rustic or cottage gardens, raised vegetable beds, where natural timber aesthetic is preferred.
When to choose steel: Modern gardens, curved designs, long-term durability, low maintenance.
For more on timber sleeper walls, see our sleeper retaining wall guide.
Steel vs Concrete edging
Concrete edging (poured or pre-formed):
Pros: Permanent, affordable (DIY poured concrete), customisable (can be shaped, coloured, stamped).
Cons: Cracks over time (especially in clay soils or freeze-thaw climates), difficult to install (requires formwork, mixing, curing), heavy, can’t be repositioned, visible and bulky (50-100mm thick).
When to choose concrete: Budget DIY projects, where mass/weight is beneficial (e.g., driveway edging), formal gardens.
When to choose steel: Where clean lines and minimal visual bulk are desired, moveable/adjustable installations, curved designs.
Steel vs Brick or paver edging
Brick or paver edging:
Pros: Classic appearance, relatively affordable, DIY-friendly, wide range of colours and styles.
Cons: Shifts and settles over time, grass grows between gaps, requires solid base (sand, concrete), time-consuming to install, difficult to create smooth curves.
When to choose brick/pavers: Traditional or cottage gardens, where edging matches existing paving, straight edges only.
When to choose steel: Modern gardens, curved designs, where grass invasion is a problem, long-term stability.
Steel vs Plastic edging
Plastic edging:
Pros: Very cheap ($5-15 per metre), easy DIY installation, flexible (handles curves).
Cons: Degrades under UV (becomes brittle and breaks), looks cheap, visible above ground (unless buried), short lifespan (3-7 years), grass runners creep under or through, not suitable for raised beds or level changes.
When to choose plastic: Temporary edging, hidden applications, very tight budget.
When to choose steel: Anywhere you want edging to last more than 5 years, any visible application, anywhere grass invasion is a concern.
Steel vs Stone or rock edging
Stone or rock edging (natural stone, river rock, stacked stone):
Pros: Natural appearance, no installation required (for loose rock), suits cottage and native gardens.
Cons: Shifts over time, grass grows through gaps, difficult to mow along, time-consuming to install (stacked stone), can be expensive (natural stone).
When to choose stone: Informal gardens, native Australian gardens, where natural aesthetic is critical.
When to choose steel: Modern gardens, clean lines, effective lawn barrier, where mowing along the edge is important.
Design Ideas: How to Use Steel Edging in Australian Gardens
1. Curved garden bed borders
Use steel edging to create flowing, organic curves around garden beds. The flexibility of steel makes it ideal for serpentine borders, kidney-shaped beds, or circular tree rings.
Install tip: Mark curve with garden hose or spray paint before installing. Gentle curves (1-2m radius) need no pre-bending. Tight curves (<500mm radius) may require pre-bending or thicker steel (2-3mm).
2. Straight, geometric beds
For modern, minimalist gardens, use steel edging to create sharp rectangular, square, or triangular beds. The clean lines of steel complement contemporary architecture.
Install tip: Use string line and stakes to mark straight edges before installing. Check corners with carpenter’s square for perfect 90-degree angles.
3. Raised garden beds
Use taller steel edging (200-300mm exposed height) to create raised beds for vegetables, herbs, or feature planting. Stack two runs of edging for extra height (400-600mm).
Structural note: For raised beds over 300mm high, use thicker steel (2-3mm minimum) or install internal supports. Soil pressure can bow thin steel.
See our raised garden beds guide for more raised bed construction details.
4. Lawn and path separation
Install steel edging between lawn and gravel, pebble, or decomposed granite paths. Creates clean edge that prevents grass invading the path and path material washing onto lawn.
Mowing tip: Install edging flush with lawn level (top edge level with soil surface). Mower wheels roll over edging, allowing you to mow right to the edge without trimming.
5. Tree rings
Circle steel edging around established trees to create mulched rings. Prevents mower and trimmer damage to tree trunks, defines tree zone, and allows you to mulch heavily without mulch spilling onto lawn.
Size tip: Make tree rings at least 1m diameter (preferably 1.5-2m) to protect tree roots and give tree visual prominence.
6. Driveway and carpark edging
Use heavy-duty steel edging (3mm thickness) along driveway edges to separate gravel or crushed rock driveways from garden beds or lawn.
Structural note: Vehicle tyres exert significant pressure. Use 3mm steel minimum, bury 150mm deep, and drive star pickets every 1-2m for support.
7. Corten feature walls
Use wide corten steel sheets (600-1200mm high) as freestanding feature walls, privacy screens, or backdrop panels for planting. The rust patina adds texture and warmth to modern gardens.
Pair with: Grasses (Lomandra, Dianella), sculptural plants (agave, aloe), native grasses (kangaroo grass), architectural plants (Xanthorrhoea, cycads).
8. Integrated lighting
Install LED strip lighting along the inside top edge of steel edging for night-time garden illumination. The thin profile of steel makes it easy to hide low-voltage LED strips.
9. Multi-level terracing
Use steel edging to create multiple levels on sloping sites. Each level can be 100-300mm high, creating terraced garden beds that reduce erosion and maximise planting space on slopes.
Structural note: For multiple tiers, ensure each level is well-drained and structurally supported (use thicker steel or internal bracing for tall tiers).
How to Install Steel Garden Edging (DIY)
Steel edging is a moderate DIY project. Installation is physical but straightforward.
Tools needed
- Mattock or grubber (for digging)
- Spade or garden edging spade
- Rubber mallet
- Level
- String line and stakes (for straight edges)
- Garden hose or spray paint (for marking curves)
- Tape measure
- Safety gloves and glasses
- Star pickets or steel stakes (optional but recommended for support)
- Joiners (supplied with most edging kits)
Materials needed
- Steel edging (measure total linear metres needed, add 10% for waste and joins)
- Joiners (overlap joiners or internal joiners — usually supplied)
- Star pickets or steel stakes (one every 1.5-2m for support)
Installation steps
1. Plan and mark
- Measure garden beds and calculate total edging length required
- Mark edging line using string line (straight edges) or garden hose/spray paint (curves)
- Ensure layout is accurate — steel edging is permanent once installed
2. Dig trench
- Dig narrow trench (50-100mm wide) along marked line
- Depth: Bury edging 50-150mm deep (depending on total edging height and soil type)
- For 150mm edging, bury 75mm, expose 75mm
- For 200mm edging, bury 100mm, expose 100mm
- Deep burial (100-150mm) provides better stability and prevents runners creeping underneath
- Straight edges: Use spade to cut clean trench
- Curved edges: Use mattock to loosen soil, then spade to shape curve
3. Install edging
- Place steel edging in trench
- Use rubber mallet to tap edging down to desired height (use level to check top edge is level along its length)
- For joins: Overlap sections by 100-150mm and secure with joiners (metal brackets that slide over both pieces), or use internal joiners (metal sleeves that slide inside both pieces)
- For corners: Bend steel to create corner (gentle pressure bends thin steel easily), or use pre-formed corner pieces if available
4. Add support (recommended)
- Drive star pickets or steel stakes into ground on the garden bed side of edging every 1.5-2m (closer spacing for curved sections or raised beds)
- Position stakes 50-100mm away from edging (not touching)
- Backfill gap between stake and edging with soil (this locks edging against stake)
Why support matters: Unsupported edging can bow outward under soil pressure, especially with raised beds or wet clay soil.
5. Backfill and compact
- Backfill trench on both sides of edging with excavated soil
- Compact soil firmly with your boot or hand tamper
- On lawn side, backfill to lawn level (edging should be level with or slightly below lawn surface for easy mowing)
- On garden bed side, backfill to desired soil level
6. Check level and adjust
- Use level to check edging is level along its length
- Tap down high sections with rubber mallet
- Add soil under low sections
7. Finish
- Water garden beds to settle soil
- Add mulch to garden beds up to edging top edge (mulch retains moisture and looks finished)
- Lawn side: ensure edging is flush with lawn level or 10-20mm below (mower wheels should roll over edging comfortably)
Common installation mistakes
Not burying edging deep enough: Shallow burial (<50mm) allows grass runners to creep underneath. Bury at least 75mm, preferably 100-150mm.
Not using joiners: Overlapping without joiners creates weak joins that separate. Always use joiners supplied with edging.
Installing edging too high above lawn level: If edging sits 30-50mm above lawn, you can’t mow right to the edge and must trim by hand. Install flush with lawn surface.
Not supporting raised beds: Unsupported edging bows under soil weight. Use stakes every 1-2m for raised beds.
DIY vs Professional Installation
DIY installation
Pros:
- Saves labour cost ($30-80 per metre for professional installation)
- Satisfying project
- Flexible timing
Cons:
- Physically demanding (digging trenches)
- Requires tools
- Learning curve (first project may not be perfect)
- Time-consuming (plan 1-2 full days for 50m of edging)
Best for: Homeowners comfortable with physical work, smaller projects (<100m), straight or gentle curves.
Cost: Materials only. Steel edging costs $15-50 per linear metre depending on type:
- Galvanised steel: $15-25/m
- Corten steel: $30-50/m
- Powder-coated steel: $25-40/m
Professional installation
Pros:
- Perfect finish
- Fast (professionals install 50m in 3-6 hours)
- Professional tools and experience (smooth curves, perfect levels)
- May include design consultation
Cons:
- Labour cost ($30-80/m on top of materials)
Best for: Large projects (100m+), complex designs (tight curves, terracing), quality-critical applications, time-poor homeowners.
Cost: $45-130 per linear metre (materials + labour).
For professional steel edging installation and landscaping services, Peninsula Hard Yards provides expert installation across Australian yards, with design consultation and guaranteed results.
Corten Steel: Pros, Cons, and Maintenance
Corten (weathering steel) has become hugely popular for Australian garden edging.
Pros
- Distinctive rust-orange patina (develops naturally over 3-12 months)
- Extremely durable (50+ years)
- Natural, earthy colour suits Australian native gardens
- No painting or coating required
- Colour deepens and stabilises over time
Cons
- More expensive than galvanised steel ($30-50/m vs $15-25/m)
- Rust staining: During first 6-12 months while patina develops, rust runoff stains paving, concrete, and light-coloured stone. Protect surrounding surfaces with sealant or accept temporary staining.
- Not suitable near pools (rust stains pool surrounds)
- Colour may not suit all garden styles
How corten patina develops
- Weeks 1-4: Steel is bright grey-orange (mill finish)
- Months 1-6: Orange-red rust forms on surface (active weathering phase). Rust runoff occurs during rain.
- Months 6-12: Rust darkens to brown-orange. Patina stabilises. Rust runoff reduces significantly.
- Years 1-5: Patina continues darkening to deep brown-rust colour. Fully stable by year 2-3.
Protecting surfaces from rust staining
Before installing corten near paving:
- Apply penetrating sealer to paving/concrete to prevent staining
- Create drainage channels to direct runoff away from paving
- Accept some staining (often considered part of corten’s character)
If staining occurs:
- Oxalic acid or phosphoric acid cleaners remove rust stains from concrete
- Pressure washing helps but may not remove deep stains
Tip: Install corten in garden beds away from high-visibility paving if staining is a concern. Use galvanised steel near patios, pools, and driveways.
Where to Buy Steel Garden Edging in Australia
Landscape supply yards: Most landscape suppliers stock galvanised and corten steel edging. Often the cheapest option if you buy directly.
Bunnings and hardware stores: Stock galvanised steel edging, star pickets, and joiners. Limited corten steel range.
Online suppliers: Many Australian online retailers sell steel edging with delivery. Search “corten edging Australia” or “steel garden edging.”
Steel fabricators: Custom orders for specific dimensions, thicknesses, or powder-coated colours. More expensive but fully customisable.
Landscape contractors: Often sell and install edging as a package. Convenient but more expensive than DIY supply and install.
Pricing guide (2026):
- Galvanised steel edging: $15-25/m (material only)
- Corten steel edging: $30-50/m (material only)
- Powder-coated steel: $25-40/m (material only)
- Joiners: $3-5 each
- Star pickets: $5-10 each
Final Thoughts
Steel garden edging offers Australian gardeners a durable, low-maintenance, and aesthetically versatile solution for defining garden beds, paths, and landscaping zones. Whether you choose affordable galvanised steel for functional edging or invest in corten steel for its distinctive rust patina and longevity, steel edging provides clean lines that suit modern Australian gardens and withstands harsh conditions for decades.
For DIY installation, the process is straightforward: dig a trench, position the edging, support it with stakes, and backfill. With basic tools and a weekend’s work, most homeowners can achieve professional-looking results. For larger projects or complex designs, professional installation ensures perfect curves, levels, and structural support.
If you’re planning a larger landscaping project that includes edging, retaining walls, paving, or garden redesign, consulting with experienced landscapers can help you create a cohesive design that maximises your outdoor space. Peninsula Hard Yards provides expert landscaping and hardscaping services including steel edging installation, garden design, and complete yard transformations across Australian properties.